Back in December we moved from a fairly large house to an apartment. This allowed us to separate our business space from our personal space as well as cut back on some of our monthly expenses. I
love our new apartment, however, it was lacking in one area... storage!
Each room in the apartment has a closet, but no drawers. We have an extra room in the kitchen, but it also just has a closet (here in older homes there is a "maid's quarters" where live-in maids used to sleep and this is what our extra room is). This is the room we decided would be our storage room.
Have I mentioned what a stud my husband is for taking this on by himself? Remember, I'm on bed rest and this project is
way out of the realm of anything I'm allowed to do. So keep in mind, as you look at the pictures, that my husband coordinated this all while doing literally everything else that doesn't involve sitting in bed or at a table (which is all I have been doing for the past week and a half).
Before...
 |
| Before... Looking in to the room from the door |
 |
| Before... Standing in the doorway looking at the closet |
 |
| Before... Facing the door |
 |
| Before... Looking out of the door in to the laundry room |
 |
| Before... the laundry room (and our front door) |
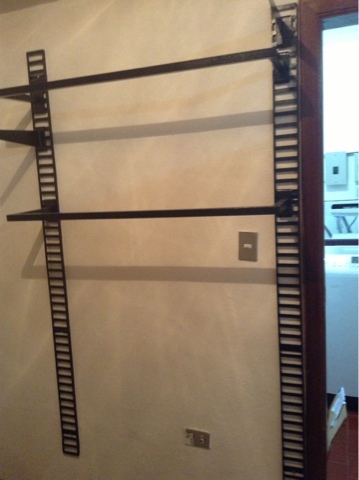
Step 1 - Let's get the bars on the walls!
As a note here, everything in Ecuador is made out of brick, cement or adobe (but most people do not live in adobe homes). This makes hanging things on walls very different to hanging things on walls in the U.S. (think a drill, cement dust, and really loud noises!).
This space needs to hold our jackets, shoes, sports equipment (including Arturo's diving gear!), sheets, towels, 2 car seats, some kitchen items, and anything else that doesn't have a home. So, lots of bars were hung to put in adjustable shelving to make the space as flexible as possible.
 |
| Step 1... And the bars were hung - one set of shelves by the door |
 |
| Step 1... And the bars were hung - one set of shelves on the far wall |
 |
Step 1... And the bars were hung -
A set of shelves next to the closet, and a final set inside of the closet (not pictured) |
Step 2... Shelving!
Here in Ecuador we like a good deal (and negotiating!). Redoing our storage area is no exception! So, Arturo purchased the metal pieces from one shop, but their quote for the wooden shelving was more than we wanted to pay. So, Arturo shopped around.
It took him 2 days of hunting to find someone who came in with a price he was happy with. He ended up contracting a company who sold the shelving in sheets and we had each shelf custom cut to fit our space.
He still needs to buy the siding for the boards so they have that "finished" look, which he will do in the next couple of days.
 |
| Step 2... The shelving on the wall next to the door |
 |
| Step 2... The shelving on the wall next to the door and the clothing bars on the far wall |
 |
| Step 2... The shelving next to the closet and the clothing bars on the far wall |
 |
| Step 2... The shelving inside of the closet (this will be for storing cooking supplies) |
 |
| Step 2... The shelving in the laundry area |
We are still organizing everything and figuring out where we would like our "stuff" to go, but I am elated with our new storage area and can't wait to be able to use it (right now I enjoy looking at it and take pictures... so helpful!).
Since we are trying to get as much done as possible before baby makes his appearance, Arturo also took on Kesha's play area at the same time.
This is what it looked like before - everything on the floor and we used our only dresser as storage for this area...
 |
| The dresser is to their right... there's not much space for play... |
This is what it looks like now! (remember, I'm sitting in bed for all of this...)
 |
| Putting in the shelves for Kesh's new desk and toy area |
 |
| The shelving from the side |
 |
Starting to get it all organized! She will be able to do her artwork at her desk (on the far left)
and we will keep her paints and other art items on the lowest shelf. |
 |
We put the things she's not currently as "in to" up higher, and
her toys "of the moment" down lower, then we can rotate. |


No comments:
Post a Comment